Thursday, March 31, 2011

New Planting bed coming soon...

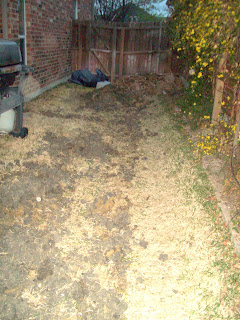
Well, I got the sprinkler fixed last Thursday which is great news.  Didn't have to call anyone out and got all of the sprinkler heads in zone 4 (back yard) located.  Well almost all - I think there is one under my dirt pile and one under my semi-compost pile.  I got the frame built for the new beds, but struggled a bit getting them leveled as there was a 10 inch difference between the top right corner and the others...  I used the excavations from the drainage to back fill the box so that I can use a lot less than a foot and half of Mels Mix... 

 I put a bit of rock in the bottom of the 1x4 box.

Not shown is the above pictures is the work I did on Sunday where the weed cloth and chicken wire was put down in each box.  Hopefully I can plant this weekend.  Already have the soil ingredients...

Oh yeah, here is the topsy turvey...

And one last shot of the 2x12 box...   The lettuce is going crazy!


Wednesday, March 23, 2011

Back at the Homestead

Sunday began the next phase.  With the french drain all done except for relocating the extra dirt, I finally got to begin clearing the spot for the next raised bed.  Actually two new beds are going in  - a std 4x4 and then a bit smaller version of a 1x4 next to the A/C system.  My wife also stated working on the Topsy Turvey - one bag of strawberries and one with a beefsteak style tomato plant.  Reviews seem to be mixed on these planters, so we will have to see how it works out.

As far as watering, I got the foundation drip line behind the 2x12 bed and got the 1/2 black poly pipe for the drip irrigation set for the bed.  Only problem is that the sprinkler system is not working.  I suppose I am going to have to call someone out...

Anyway, lotsa of work, but hopefully I can plant the next beds this weekend!!

I know what they sell at Lowe's and Home Depot...

WORK!  For the end of spring break vacation last week we went to my mom's.  I spent the first few days trying to finish my french drain.  Mom had a suprise for me...  She wanted me to "fix" her landscaping...  Back to the shovel....

Anyway, I put in several new shrubs, moved some rocks, planted some flowers and put out new mulch.  As a bonus, I put in a mini-herb garden...  Rosemary, basil, oregano, and thyme...


Wednesday, March 16, 2011

Garden update

The raised bed is doing well.  Things are starting to grow!  The new radishes, mesculm, and spinach are coming up now.  The lettuce is starting to perk up and the broccoli is showing small florettes in them now.  I am hoping that they all finish up in the next 30 days (except the onions and carrots) so I can get some peppers and tomatoes working!  

Clockwise from top right - cauliflower, spinach, radishes and broccoli


Other half of the right bed - clockwise from the top right;  cauliflower, barely visible carrots, mesclun, and broccoli


New spinach is barely sprouting in the bottow two squares....


Newly planted radishes and mesclun in the bottom squares


Two pics of lettuces and onions... (and a bit of swiss chard...)


Tuesday, March 15, 2011

End of the line

I needed a way to keep critters out of my drain line, so improvised by buying an end cap and drilling numerous small holes in it.  If it gets enough pressure, it will blow off the end, but it should do the trick for normal thunderstorms. 


Anyway, I should finish up the drainage project with another days worth of work.  I have some more backfilling to do.  I have extra rock to put around the A/C units as well as behind the 2x12 box and maybe enough to make a drainage area around a couple of other trouble spots.  I will also need to move all the extra dirt to build up some low areas or the area under my next 4x4 bed.  This has been a lot of work to put in another garden box.  Why did it have to go where the gutter downspout was located?  I guess the next big project will be sprinkler conversion to drip irrigation.

Rock me Amadeus...

A titular tribute to Falco...  I couldn't resist and another "Driving the shovel" title would have been too much.  Today was major work on the French drain project.   I bought a bit over 3000lb of rock from the local rock  yard to start the day.  Since I am truckless, I rented the Lowe's truck.  Since the rate was hourly, step one was shovel all the rocks off the truck and onto the driveway.  It took about an hour to move them all and to clean the bed up of all the dust and "rockettes".  First flaw in the plan...  I needed a tool to move the rocks to the yard.  I don't have space for a big wheel barrow, so I picked up what  I have come to call "El burro piquito" - the little donkey.  It is technically a yard cart with a 3 cu ft capacity.  I didn't fill it up because I was worried that it would break.  I felt like Sancho Panza from the novel Don Quixote pushing this little cart  around that was barely adequate to the  task.

Anyway, I set the drainage bed and then started putting pipes together.  I then put more rocks over the top of the pipe and began to back fill the "dirt"  I put that in quotes because most of the dirt is nothing more than hardened clay now.   I bet I could make bricks out of it!  So here are few more pics.


Sunday, March 6, 2011

Driving the shovel - day two....

With church and bible study, I only had a few hours to work today, but I managed to get the main line almost complete.  As far as excavating, all the is left is the north end gutter pipe across to the french drain and the end out from  the end of the house under the fence and to the alley way.  We also planted the last of the 24 original squares today - 2 spinach, a radish and a mesclun - Maegan actually put the seeds in the ground and then we gave them a quick blessing.  Time to update the spreadsheet.


I have to figure out how much drainage rock I am going to need....  let see...  pi*r squared or something like that...  8"x8" x 70' - pi x 2.25"squared x 70' = some calculations, etc - say 3 cu yds should do the trick and leave a bit extra for around the A/C's.

Saturday, March 5, 2011

How to drive a shovel...

After the daughter's slumber party was over, I went to Lowe's and picked up some drain pipe and other supplies.  I actually found a better down spout pipe for the gutter pipe at the end of the house.   I ended up making the line a bit deeper so that  it will intersect with the french drain at the right depth. 


I have about 30 feet excavated and have about 40 feet more to go.  This is going to be more work than anticipated.  I should be able to finish by next weekend I think.  I still have some calculation to figure out how much drainage rock I am going to need.  Instead of doing the math again, I am going to get 1/2 cu yd of drain rock and see how many feet it works out to. 

Back at it...

Well lots to do today.  Probably need to get some more vermiculite today so I have it at the ready.  Also need to plant some more salad stuff.  I still have to finish my french drain to work the water out of my side yard and tie my gutter downspouts into it.  This is truly a "shovel-ready project"  I have approximatey 70 feet to trench.  I got started a bit last weekend.  My next raised bed is going right over the top of this:


One foot deep and one foot wide start of the drain trench:


Friday, March 4, 2011

Sprouts everywhere

So now its not just the radishes, but also the mesclun, the spinach, and even the carrots!  I am starting to feel like a real gardener.  I will probably finish planting the last four boxes this weekend.  I think I am going to go with two square feet of spinach, another square of mesclun, and one more set of radishes.  They should all be done by the end of March so I can harvest and replant peppers and tomatoes!

More transplants

I am trying to fill the box up as quickly as I can so I can harvest and get a warm season crop in the ground. So on Saturday and Sunday, I planted two squares of yellow onions, two squares of red onions, four butter crunch lettuce heads in each of two squares, four romaine in a square, and one square with four swiss chard plants.  I have never had swiss chard, so this is more of "curiosity square than anything else.

Wednesday, March 2, 2011

Radishes germinate

Well, it only took 3 days for the radishes to germinate!  Planted on Tuesday and the first green speck showed on Friday evening. Not sure you can see them in the pic, but they are there, barely poking through the ground...  Oh, I forgot.. In one square foot I planted 16 radishes.  The other squares are 16x carrots, and 9x spinach.  The mesculn - heck I didn't know what to do, so I just spread lots of seeds around, leaving like a one inch margin around the square...

Seeds in the Ground!

My daughter and I decided to plant some seeds during the lask week of March.  We planted spinach, carrots, radishes, and mesculm mix.  According to the packages should see germination of the radishes first in about 7 days...  You can't see them, but the little "seedies" are underground doing their magic!

Green!

Dirt mixed, box filled.  I probably jumped the gun a bit and bought some broccoli and cauliflower transplants.  In retrospect, I should have soaked the Mel's Mix more thoroughly with water, as it has so much peat moss and vermiculite it soaks up that water like a sponge!  Lesson learned for box two...  Anyway, here are the plants...


Oh yeah, I forgot - I used string to mark off the squares and put inthe trellis frames.  Now I just have to get some netting to put on there before "tomato season"

Tuesday, March 1, 2011

Making Dirt!

Well, a week has gone by and I have to make the dirt to put in the planter box.  Lesson were learned!  The book says to mix at least 5 different kinds of compost together to make the compost mix and then to mix in the vermiculite and the peat moss. 


As you can see from this picture, there are a lot of bags to be emptied and mixed.  I calculated that I would need 32 cubic feet of mix to fill up the box.  I picked up the following composts:  mushroom, black  kow composted manure, Texas compost mixture, "organic" compost, and Good Earth compost.  I thought I would need a bit over 2 cu ft of each.  I laid out my tarp and emptied half of the compost on it.  It was now two heavy to lift back and forth to mix, so I had to break out the shovel to mix it up.  Then it was too heavy to slide over next to the raised bed, so I had to shovel and carry the mix to the planter.  I was so tired and sweaty by the end that I forgot to take pics of the process.  When I finished the next day, I learned and made three batches out of the second batch and it was much easier!

The next day... February 13th...

Next was the carpentry...  Given the slope, I built a two part frame (all untreated wood - no need taking the chance on the chemicals) - the bottom began as three sided "box" built from 2"x10" lumber.  The top was a box built from 2"x10" for all four sides with two cross pieces that broke the size up from a single 2'x12' to three separate 2'x4' areas.


Turns out that the three sided box did not work as well as both ends were kinda "floppy".  To solve the problem, I added a 2"x4" to tie the ends together.  I then had to do some minor excavation and leveling of the bottom frame.


Now to set the other box on top of the first. I cut 2"x4" stakes to drive in front of the box to hold it in place in case it wanted to slide down the hill.


Day One - February 12th...

The first thing to do for my Frisco Square foot garden was to get the chosen spot ready and build the wood frame.  I picked a spot that gets full on the south side of the house.  That spot will allow a raised bed that would measure 2' wide by 12' long.  There is a slope from the garage to the other side of the box that drops about 10 inces over the two foot planned width. 
I next scraped off the grass pretty well with a flat blade shovel. I then put down chicken wire to keep out varmits (I remember dad and grandpa battling gophers in their old 30ft row gardens...) I also put down weed guard and used staples to hold it all down.

During this process, I ran across a sprinkler head.  I had to dig down to the connection with PVC supply pipe and installed a piece of funny pipe and added the sprinkler head back to the pipe for the time being.  I will be installing drip irrigation later in the season.


I started working on the frame.  I was close to getting finished, but time for Valentine's Day dinner reservations seemed to show up quicker than I realized...  Had to drop it unless I wanted to reconfigure the lumber into the shap of a doghouse!